Friday, October 31, 2008

A New Cookbook

I love to use my crockpot. It is so handy to just pop a meal in it in the morning, and then by dinnertime all that needs doing is to set the table. Recently I was talking to a friend, and she told me about a series of cookbooks entitled "Fix-It and Forget-It". She said that every recipe she has tried from the cookbooks has been good. I hadn't heard of these before, and made a mental note to look them up. You can imagine my surprise when on a recent trip to Costco I was very pleased to find this book just sitting there on the shelf waiting for me to pick it up:


This cookbook is a collection of 1400 of the best recipes from all 5 of the cookbooks in the series. Of course I bought it, and have been looking through it deciding which recipes I want to try first. I will keep you posted on our favorites.

Wednesday, October 29, 2008

Apple Pie #2

Here is the recipe for the next Apple Pie, or in this case it shall be referred to as Apple Pie #2. This pie recipe comes from yet another of my favorite cookbooks, "The Fannie Farmer Baking Book" by Marion Cunningham. In the cookbook, it is entitled "Basic Master Recipe: American Apple Pie". It is written for someone who has never made a pie before, and takes up a little more than 9 pages in a cookbook. That is a lot of pages! It gives extremely detailed directions along with illustrations of everything involved. So if you have never made a pie before, and are in need of being walked through the process step by step, then this cookbook is for you. I am going to limit my recipe to the most important part -- the apple filling; and assume that you either already know how to make a pie crust, or know where to find ready made crusts in your local grocery store. And as a side note, I used to buy the ready made crusts. When my children were younger, that seemed to be the easiest way to get a pie baked in a hurry. And then one day, I was referring to how my mom makes the best pie crusts in the world. One of my daughters looked at me with a surprised look on her face and said, "you mean you can make pie crusts?" At that moment I decided I needed to stop buying the ready made pie crusts, and start making them from scratch. It doesn't take that much time, and they really are far more superior to the store bought. Besides the fact that I felt horrified that my kids didn't even know that someone could "make" them.

My kitchen is very tiny, so when I do make pie crusts, I take over the kitchen table since I don't have the cupboard space. Here is proof that I did indeed make a homemade crust for "Apple Pie #2":


And now on to the recipe.
Apple Pie #2
Unbaked pie crusts for a double crust pie
8 cups sliced and peeled apples
3/4 cup sugar
1/2 tsp. cinnamon
1/4 tsp. nutmeg
2 T. flour
1/8 tsp. salt
1 T freshly squeezed lemon juice
2 T. (1/4 stick) butter
Preheat the oven to 425 degrees.
Stir together the sugar, cinnamon, nutmeg, flour, and salt. Combine with the apple slices. Sprinkle the lemon juice over this mixture and mix together. Pour the apple mixture into your unbaked pie crust. Slice the butter into small pieces onto the top of the apples. Place the top crust over all, press the edges of the crusts together and flute. Don't forget to cut a few slits into the top crust before baking. If you like, you can cover the edges of the pie crust with foil to keep them from browning too much.
Place the pie in the oven and bake for 30 minutes. Reduce the heat to 350 deg. and continue baking for 20 to 30 minutes, or until done.
This is what mine looked like before I popped it into the freezer. We will be tasting Apple Pie #2 at a later time.


Tuesday, October 28, 2008

A Great Apple Snack

As I have mentioned previously, we have a lot of apples at our house. It is so nice to grab a fresh apple when the afternoon munchies hit. A typical way I like to have apples for a snack is to scoop some peanut butter into a small bowl, and dip the apple slices into it before taking a big bite. The other day I improved on that a bit. At least I think it was an improvement. I put some peanut butter into a small bowl, and pushed it up against the sides of the bowl leaving a small well in the middle. Then I put a small amount of chocolate syrup into the well, heated it up in the microwave for about 20 seconds, or when the chocolate started to bubble. I gave it a good stir, and now I don't know that I will ever be able to go back to the plain old peanut butter again. This was quite tasty!!

Sunday, October 26, 2008

Pumpkin Pie

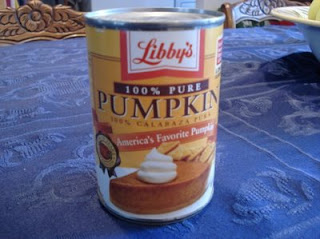
Sometimes at this time of year my kids will ask me to make a pumpkin pie. Typically though I will tell them that it is getting so close to Thanksgiving that I want to wait until then so we can really look forward to that first bite of pie after our Thanksgiving dinner. At that point my daughters will usually remind me about my dad. He really enjoyed pumpkin pie. Whenever he was wanting one, he wouldn't ask my mom. All he would do was leave a can of pumpkin out on the cupboard for her to discover. When she would see it, she immediately knew that he would like a pumpkin pie. Of course she would make him a pumpkin pie right away. So the other morning when I went into the kitchen, this is what I saw sitting on my kitchen cupboard:


with a note attached written in all capital letters saying PLEASE. So how could I resist such a request. Later that day when my kids got home from school, they were very surprised to see that I had actually baked them this:


I don't think it lessened our anticipation for our Thanksgiving pumpkin pie by any means. It only has made us look forward to it all that much more.

Saturday, October 25, 2008

Tea

I love tea. In fact at this very moment I have a mug filled with hot tea beside me. There is just something special about beginning a morning with a nice cup of tea. Sometimes I drink it out of a mug. Other times I drink it out of a china teacup. But there is always some thought put into which vessel I want to begin my day with. This morning it is a mug. But I did make an entire pot of tea today so that I can continue to enjoy it throughout the morning. No, I don't actually drink the entire pot of tea; but it is quite common for me to drink part of my tea while it is hot, and then the rest of the tea gets cold while I am tending to something else. When this happens, I can just pitch the cold tea, and refill my cup with hot tea from the teapot. Sometimes though when I reach for a mug to use, I see this ugly tea stain that has been left behind. That isn't any fun. But my daughter told me of a great way to get rid of those tea stains. It only takes a couple of minutes, and your favorite mug will be as good as new. Just put some baking soda in the bottom of the mug or cup and add some vinegar. It will begin to fizz briefly. After the fizzing stops, just scrub the inside of the mug with a sponge or dishcloth, and the stain is gone. Having a shiny clean mug or teacup to pour your tea into makes the ritual all that more pleasant.

Thursday, October 23, 2008

What's for Dinner?

We've all been there before. You wake up in the morning with the thought that you hope to make today very productive and organized. You think that perhaps you should decide on what you will be having for dinner in the morning to be able to cross that item off of your list. Nothing really comes to mind, but it is still early, so you put it off until later. Lunchtime rolls around and you remember that you still need to come up with something for dinner. Again, it is still early, no problem. And then about 4:30 in the afternoon, you realize that you have completely forgotten about what to plan for dinner. You actually begin to break out into a slight sweat because now you know that the pressure is on. It is only a matter of minutes, maybe seconds, before someone walks into the kitchen with the age old question, "what's for dinner?" There is no answer to that question because you haven't planned anything. Time to fall back on an old standby, and calmly answer the question as if you had known all along what would be for dinner. Sometimes in our house the answer is Pasta and Meatball Soup. It is a recipe from one of my nieces that we got out of a great cookbook entitled, "Hot Providence". This is another of my cookbooks that gets pulled down from the shelf on a regular basis. So just in case you need a standby meal for those nights when you dread hearing the question that you have no answer to, the recipe follows:

Pasta & Meatball Soup

Meatballs:
1 lb. ground beef
1/2 cup bread crumbs
1/4 cup chopped onion
2 T. milk
2 T. chopped fresh parsley
1/2 t. marjoram
1/4 t. salt
1/8 t. pepper
1 egg

Soup:
2 T. oil
1 onion
1 carrot, diced
1 1/2 cups celery, chopped
1 clove garlic, minced
2 bay leaves
1/2 package corkscrew pasta
1 cup fresh spinach, chopped
1 (6 oz.) can tomato paste
3 cups water
1 t. salt
1 t. basil
1 t. oregano
1/2 t. rosemary
1 (28 oz.) can Italian plum tomatoes
1/4 t. pepper
Grated Parmesan or mozzarella cheese

To prepare meatballs: mix ingredients and form into round 1 inch balls. In soup pot cook the meatballs on medium/high heat until browned all around. Drain on paper towels. Save drippings.

To prepare soup: In the drippings cook onion, carrot, celery, and garlic until tender. Add tomatoes, tomato paste, water, salt, spices, and bay leaves. Break up tomatoes. Add meatballs. Over high heat bring to a boil. Then reduce heat to low. Cover. Simmer 30 minutes and stir in pasta. Cook for 10 more minutes. Stir in spinach. Cook 5 minutes and garnish with cheese. Serve.

Wednesday, October 22, 2008

Tacos

Tacos -- who doesn't like tacos. At our house we have them once a month. They are so easy to make, and everyone's eyes light up around here when they find out that that is what we are having for dinner. For me, it is a quick meal to put together. The only thing out of the ordinary that I do is to make my own taco seasoning mix. Yes, I know you can just buy the little packets in the grocery store. That, of course, is the easiest. But it costs much less, and barely takes any time at all to make your own. So I am going to share my recipe for taco seasoning mix. It really isn't "my" recipe at all, but comes from another of my favorite cookbooks, "Make-A-Mix Cookery", by Eliason, Harward, & Westover. When I was first married, I came across this cookbook and liked it so much, that I bought it as gifts for several people. I believe it is out of print now, but I have begun to look for it at used bookstores to get my daughters all a copy of their own.

Taco Seasoning Mix

2 tsp. instant minced onion
1 tsp. salt
1 tsp. chili powder
1/2 tsp. cornstarch
1/2 tsp. crushed dried red pepper
1/2 tsp. instant minced garlic
1/4 tsp. dried oregano
1/2 tsp. ground cumin

Combine all ingredients in a small bowl until evenly distributed. After browning 1 lb. of ground beef, add the seasoning mix, along with 1/2 cup water, and simmer for 10 minutes, stirring occasionally.

And there you have it -- your very own taco seasoning mix.

Tuesday, October 21, 2008

Saving Tomato Seeds

I love tomatoes, especially home grown tomatoes. There is no contest in taste between a fresh picked, home grown tomato and a store bought tomato. The flavor difference is amazing.

Each year I plant a lot of tomatoes -- 14 plants to be exact. Two of those plants are very special tomato plants. The original seed packets came from Austria from my sister and brother-in-law when they had vacationed there. They are the cutest plants. They are very small, but grow a nice sized tomato, just a little smaller than a typical Early Girl. I don't know the official name of them because the seed packet is all in German. So I just call them my "Austrian tomatoes". The first year I planted them in the garden amongst all of the other tomato plants they looked like miniature tomato plants. The following year I decided to try them in pots, and they did great. When I had finally come to the end of my seeds, I decided I would try saving the seeds from the last of the Austrian tomatoes. So I did a bit of looking around to see how one goes about saving seeds, and this is what I found out, and it works great.

Cut open the tomato that you want to save the seeds from. Scoop out the insides of the tomato where the seeds are and place them in a small container. Add 2 tablespoons of water. Cover with plastic wrap and poke a couple of holes in the plastic so that air can circulate. Each day give the container a little stir. After a couple of days they will have begun to ferment. At this point carefully scrape off all of the stuff on the top, and thoroughly rinse the seeds in a small strainer. Place the seeds on a clean coffee filter or a piece of waxed paper, and let them sit to dry for a couple of days. Once they are completely dry, you can store them in a plastic bag and they are ready to plant next spring. I also label the year on the package.

Tomato seeds last a long time. Don't let anyone fool you into thinking they are only good for one year. This year I planted seeds that I had saved in 2002, and they germinated beautifully. I also have saved seeds from volunteer tomato plants that have grown in my garden that were different than any others that I have grown. This year for instance, I had some absolutely amazing cherry tomatoes that volunteered. They were the best cherry tomatoes that I have ever eaten. So I have saved the seeds, and will plant them next year. I will let you know how they turn out next summer.

Sunday, October 19, 2008

Apple Pie #1

Apple season is upon us. My neighbors have been very generous with their apples this year, and have given us an abundance. They are delicious, and it is so wonderful to be able to grab a fresh apple for a snack. I wish that my boxes would stay full and crisp all year long; but unfortunately they need to be used up before they go bad. Actually it isn't unfortunate at all, because that means it is time to make up all sorts of fun apple treats. Today we had our first apple pie of the season. It really hit the spot. Every year I search for the absolutely perfect apple pie recipe. I haven't found it yet, but we sure have fun trying out different recipes. So I am going to post some of the different recipes that we try so that just in case there really is someone out there reading this blog, they can try them as well. So tonight's recipe comes from the cookbook entitled, "Just a Matter of Thyme" by Roxie Kelley and Shelly Reeves-Smith. This is actually one of my favorite cookbooks that I have. I turn to it quite often to make different things out of it. My brother and sister-in-law gave it to me for a birthday gift one year, and I still have the birthday card in it to use as a bookmark. I think birthday cards make great bookmarks ... but that is a topic for another time.

Apple Pie #1
Unbaked pie crust for double crust pie.
8 or 9 tart cooking apples, pared
¾ cup sugar, more if desired
6 Tbsp. Flour
1 tsp. cinnamon
1 tsp. nutmeg
2 Tbsp. Butter

In a small bowl, combine flour, sugar, cinnamon and nutmeg. Sprinkle about ¼ cup of mixture on the bottom of the pie crust, and add the rest to the apples. Stir to coat apples. Fill pie crust heaping full of apple mixture, dot with butter. Place top crust over filling, flute edges. Cut slits on top crust and sprinkle with sugar. Bake about 50 minutes at 400°. Serve with vanilla ice cream.

Saturday, October 18, 2008

The Quilt Show

This weekend is the 30th annual quilt show put on by the Washington State Quilters in Spokane, Washington. I have been attending since 1990, only missing one year when my youngest was born. It is an amazing show, and has grown a great deal since I started attending. This year I attended with my sweet mom, and my two oldest daughters. We had such a great time.


It is so inspirational to see so many completed quilts. It always makes me just want to come home and fire up the sewing machine. This was my favorite quilt of the show:


It was such a cheerful quilt. And besides, I do like red a great deal. After admiring it, I looked at the tag to read about who had made it; and it was actually made by a cousin of mine who gets together every year with all of the girls in her family to do some quilting. This particular quilt was actually a collaboration of all of them. They then had a drawing to see which one of them would get to keep it. Doesn't that sound like fun!!

I hope to make it back to the show on Sunday to hit the merchant mall. We actually ran out of time yesterday to do much shopping. I love bringing home fabric and new patterns to eventually make some day. And even if I don't ever make them, I do have fun looking at them and thinking of their many possibilities.

Thursday, October 16, 2008

Sweet Peas

I love sweet peas. They are such a pretty flower. They are early to bloom, have the prettiest colors, and smell so sweet. This year I was very fortunate to enjoy sweet peas all summer long. Typically they will die out once the weather gets too hot. But this year, I guess since we had such a late spring, they lasted up until last week when we got our first hard frost. But the one very special thing for me about sweet peas is that my dad loved them too. So when I see sweet peas, I think of him. When I am planting my sweet peas each year, I think of him. And when I have beautiful bouquets of sweet peas in the house, I think of him. So now every time I pull up this page I can also think of him. That is why I entitled this blog Sweet Peas and Happy Things .... for him. I can remember him, and think of all of the happy things that I have been blessed with in my life ... of which there has been an abundance.

Wednesday, October 15, 2008

Chocolate Cake


There is something about chocolate cake that even a 1 year old can appreciate.


Tuesday, October 14, 2008

Another Day

Another day has nearly rolled by. I'm still trying to figure out how to make things look nice on the blog page. My faithful followers have requested another posting. They tell me that it doesn't really matter what I say.
I doubt I will ever have as interesting things to post as one of my nieces. If you want to read about an exciting day in a family of 7, then you should read this: http://femina.reformedblogs.com/2008/10/14/luggage/ It is a hoot!!
(And there you go, I have posted my first link)

Monday, October 13, 2008

It's All New to Me

So this is a first for me. I've officially created my own blog. Not that anyone will be adding this to their daily blog reads any time soon, but it is a beginning. I'm really not sure what I will be posting on it, but that doesn't really seem to matter. The point is, I have joined the 21st century and have a blog.